Squashing the Competition One Court at a Time

With squash court construction continuing to progress here in the United States, I figured it was time to mention a few of the design and construction aspects to consider when working on a squash court project. The information below is based on our experience in the industry but should not be considered the only way to design or construct a squash court.
First, most squash courts that we seeing being constructed are certified and approved by the World Squash Federation (WSF). What this means is that the court construction company is providing you with WSF certified materials. The court itself is not individually tested and approved by the WSF so ask your court company for the WSF certificates for the panels, flooring and glass walls to ensure you're being quoted WSF materials. In additional to having WSF materials installed, you want to confirm that the court size itself is exact and isn't "going against" the size requirements for a certified court.
Typically it is the manufacturer who has their materials certified and approved; not all manufacturers in the industy and not all systems of those manufacturers are certified and approved by the WSF. So, when comparing information on the materials, it maybe be challenging to review the information as "apples to apples" since what might be WSF approved with one company may not be the same for another. The best thing to do is to ask for help and ask questions so that you're more informed about what you are receiving.
When it comes to design and construction of the courts, many of the projects that we see want us to provide the WSF materials up to the play lines only - panels on the front and side walls and glass at the rear wall. The play lines are 15'0" at the front wall, 15'0" to 7'0" at the side walls and 7'0" at the rear wall. Granted, this is what we typically see but we can certainly provide the materials differently for your project.
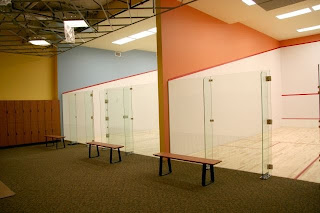
With the panels stopping at the play lines, most courts will install the court framing from floor to ceiling (18'6" minimum) and then install drywall (or plywood) from floor to ceiling finishing with the installation of the wall panels over the face of the drywall up to the play lines. With this type of design, you create a "ledge" around the court which acts as a pretty defined boundary line once you finish the panel edge with trim or molding. As an option to finish out the white court walls, you can finish and paint the drywall area above the panels in a different color to better define the in-play and out-of-play areas even more. (NOTE: If you want a custom color wall panel in lieu of white, that is not a problem but not all companies have the ability to provide this option.)
As I previously mentioned, the information described above is what we typically see for squash construction but it's not the only way to construct a court. For example, if you want the panels to extend up to the ceiling, if you want panels on the ceiling or if you want a different size glass wall, that is certainly not a problem. The best starting point is to contact us and we can discuss your project in more detail and evaluate the best design for your project. Let us help you create a quality squash court.
For more information, you can visit the squash section of our website or you can contact Erika Milligan directly at (303) 663-8155 or at erika@squashcourts.com.


0 Comments:
Post a Comment
Subscribe to Post Comments [Atom]
<< Home